Téléchargement de la documentation
Veuillez patienter pendant que le téléchargement se lance...
Containerizing an Event Posting App Built with the MEAN Stack (03-28-2023)
This article was fetched from an rss feed
This article is a result of open source collaboration. During Hacktoberfest 2022, the project was announced in the Black Forest Docker meetup group and received contributions from members of the meetup group and other Hacktoberfest contributors. Almost all of the code in the GitHub repo was written by Stefan Ruf, Himanshu Kandpal, and Sreekesh Iyer.
The MEAN stack is a fast-growing, open source JavaScript stack used to develop web applications. MEAN is a diverse collection of robust technologies — MongoDB, Express.js, Angular, and Node.js — for developing scalable web applications.
The stack is a popular choice for web developers as it allows them to work with a single language throughout the development process and it also provides a lot of flexibility and scalability. Node, Express, and Angular even claimed top spots as popular frameworks or technologies in Stack Overflow’s 2022 Developer Survey.
In this article, we’ll describe how the MEAN stack works using an Event Posting app as an example.
How does the MEAN stack work?
MEAN consists of the following four components:
- MongoDB — A NoSQL database
- ExpressJS — A backend web-application framework for NodeJS
- Angular — A JavaScript-based front-end web development framework for building dynamic, single-page web applications
- NodeJS — A JavaScript runtime environment that enables running JavaScript code outside the browser, among other things
Here’s a brief overview of how the different components might work together:
- A user interacts with the frontend, via the web browser, which is built with Angular components.
- The backend server delivers frontend content, via ExpressJS running atop NodeJS.
- Data is fetched from the MongoDB database before it returns to the frontend. Here, your application displays it for the user.
- Any interaction that causes a data-change request is sent to the Node-based Express server.
Why is the MEAN stack so popular?
The MEAN stack is often used to build full-stack, JavaScript web applications, where the same language is used for both the client-side and server-side of the application. This approach can make development more efficient and consistent and make it easier for developers to work on both the frontend and backend of the application.
The MEAN stack is popular for a few reasons, including the following:
- Easy learning curve — If you’re familiar with JavaScript and JSON, then it’s easy to get started. MEAN’s structure lets you easily build a three-tier architecture (frontend, backend, database) with just JavaScript and JSON.
- Model View Architecture — MEAN supports the Model-view-controller architecture, supporting a smooth and seamless development process.
- Reduces context switching — Because MEAN uses JavaScript for both frontend and backend development, developers don’t need to worry about switching languages. This capability boosts development efficiency.
- Open source and active community support — The MEAN stack is purely open source. All developers can build robust web applications. Its frameworks improve the coding efficiency and promote faster app development.
Running the Event Posting app
Here are the key components of the Event Posting app:
- MongoDB
- Express.js
- Angular
- Node.js
- Docker Desktop
Deploying the Event Posting app is a fast process. To start, you’ll clone the repository, set up the client and backend, then bring up the application.
Then, complete the following steps:
git clone https://github.com/dockersamples/events cd events/backend npm install npm run dev
General flow of the Event Posting app
The flow of information through the Event Posting app is illustrated in Figure 1 and described in the following steps.
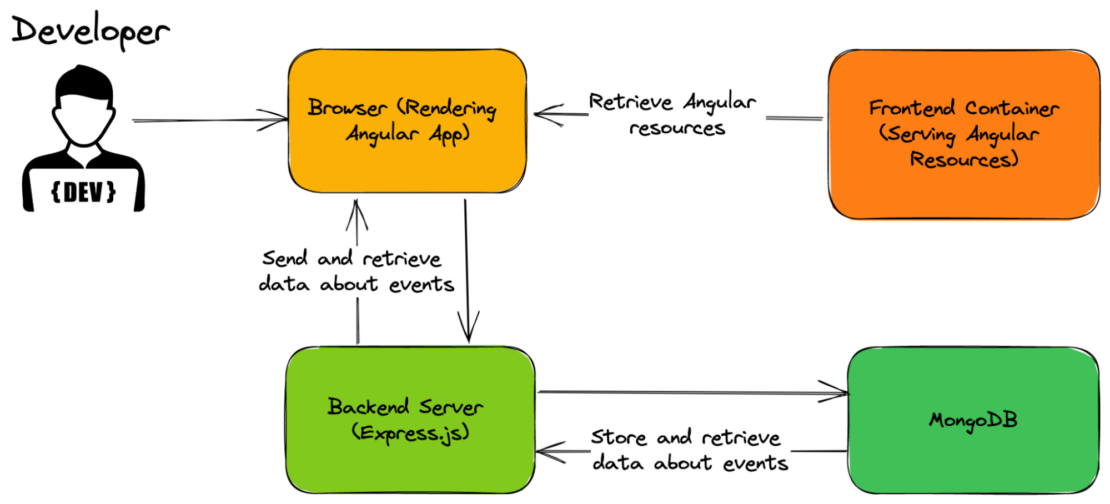
Figure 1: General flow of the Event Posting app.
- A user visits the event posting app’s website on their browser.
- AngularJS, the frontend framework, retrieves the necessary HTML, CSS, and JavaScript files from the server and renders the initial view of the website.
- When the user wants to view a list of events or create a new event, AngularJS sends an HTTP request to the backend server.
- Express.js, the backend web framework, receives the request and processes it. This step includes interacting with the MongoDB database to retrieve or store data and providing an API for the frontend to access the data.
- The back-end server sends a response to the frontend, which AngularJS receives and uses to update the view.
- When a user creates a new event, AngularJS sends a POST request to the backend server, which Express.js receives and processes. Express.js stores the new event in the MongoDB database.
- The backend server sends a confirmation response to the front-end, which AngularJS receives and uses to update the view and display the new event.
- Node.js, the JavaScript runtime, handles the server-side logic for the application and allows for real-time updates. This includes running the Express.js server, handling real-time updates using WebSockets, and handling any other server-side tasks.
You can then access Event Posting at http://localhost:80 in your browser (Figure 2):

Figure 2: Add a new event.
Select Add New Event to add the details (Figure 3).
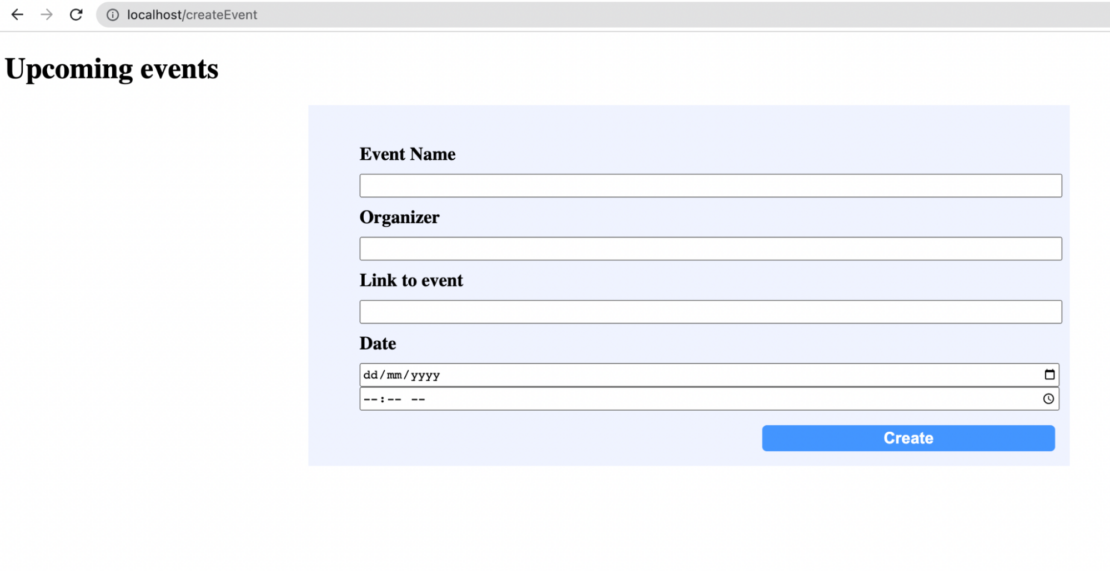
Figure 3: Add event details.
Save the event details to see the final results (Figure 4).
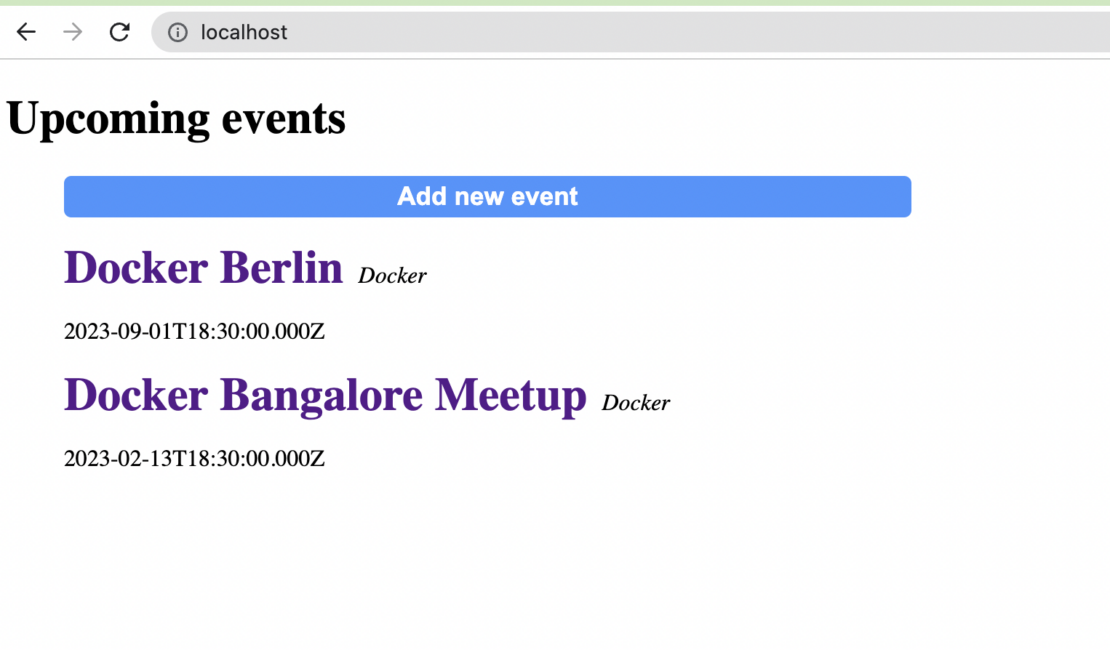
Figure 4: Display upcoming events.
Why containerize the MEAN stack?
Containerizing the MEAN stack allows for a consistent, portable, and easily scalable environment for the application, as well as improved security and ease of deployment. Containerizing the MEAN stack has several benefits, such as:
- Consistency: Containerization ensures that the environment for the application is consistent across different development, testing, and production environments. This approach eliminates issues that can arise from differences in the environment, such as different versions of dependencies or configurations.
- Portability: Containers are designed to be portable, which means that they can be easily moved between different environments. This capability makes it easy to deploy the MEAN stack application to different environments, such as on-premises or in the cloud.
- Isolation: Containers provide a level of isolation between the application and the host environment. Thus, the application has access only to the resources it needs and does not interfere with other applications running on the same host.
- Scalability: Containers can be easily scaled up or down depending on the needs of the application, resulting in more efficient use of resources and better performance.
Containerizing your Event Posting app
Docker helps you containerize your MEAN Stack — letting you bundle your complete Event Posting application, runtime, configuration, and operating system-level dependencies. The container then includes everything needed to ship a cross-platform, multi-architecture web application.
We’ll explore how to run this app within a Docker container using Docker Official Images. To begin, you’ll need to download Docker Desktop and complete the installation process. This step includes the Docker CLI, Docker Compose, and a user-friendly management UI, which will each be useful later on.
Docker uses a Dockerfile to create each image’s layers. Each layer stores important changes stemming from your base image’s standard configuration. Next, we’ll create an empty Dockerfile in the root of our project repository.
Containerizing your Angular frontend
We’ll build a multi-stage Dockerfile to containerize our Angular frontend.
A Dockerfile is a plain-text file that contains instructions for assembling a Docker container image. When Docker builds our image via the docker build command, it reads these instructions, executes them, and creates a final image.
With multi-stage builds, a Docker build can use one base image for compilation, packaging, and unit testing. A separate image holds the application’s runtime. This setup makes the final image more secure and shrinks its footprint (because it doesn’t contain development or debugging tools).
Let’s walk through the process of creating a Dockerfile for our application. First, create the following empty file with the name Dockerfile in the root of your frontend app.
touch Dockerfile
Then you’ll need to define your base image in the Dockerfile file. Here we’ve chosen the stable LTS version of the Node Docker Official Image. This image comes with every tool and package needed to run a Node.js application:
FROM node:lts-alpine AS build
Next, let’s create a directory to house our image’s application code. This acts as the working directory for your application:
WORKDIR /usr/src/app
The following COPY instruction copies the package.json and src file from the host machine to the container image.
The COPY command takes two parameters. The first tells Docker which file(s) you’d like to copy into the image. The second tells Docker where you want those files to be copied. We’ll copy everything into our working directory called /usr/src/app.
COPY package.json .
COPY package-lock.json . RUN npm ci
Next, we need to add our source code into the image. We’ll use the COPY command just like we previously did with our package.json file.
Note: It’s common practice to copy the package.json file separately from the application code when building a Docker image. This step allows Docker to cache the node_modules layer separately from the application code layer, which can significantly speed up the Docker build process and improve the development workflow.
COPY . .
Then, use npm run build to run the build script from package.json:
RUN npm run build
In the next step, we need to specify the second stage of the build that uses an Nginx image as its base and copies the nginx.conf file to the /etc/nginx directory. It also copies the compiled TypeScript code from the build stage to the /usr/share/nginx/html directory.
FROM nginx:stable-alpine
COPY nginx.conf /etc/nginx/nginx.conf COPY --from=build /usr/src/app/dist/events /usr/share/nginx/html
Finally, the EXPOSE instruction tells Docker which port the container listens on at runtime. You can specify whether the port listens on TCP or UDP. The default is TCP if the protocol isn’t specified.
EXPOSE 80
Here is our complete Dockerfile:
# Builder container to compile typescript FROM node:lts-alpine AS build WORKDIR /usr/src/app
Install dependencies
COPY package.json . COPY package-lock.json . RUN npm ci
Copy the application source
COPY . .
Build typescript
RUN npm run build
FROM nginx:stable-alpine
COPY nginx.conf /etc/nginx/nginx.conf COPY --from=build /usr/src/app/dist/events /usr/share/nginx/html
EXPOSE 80
Now, let’s build our image. We’ll run the docker build command as above, but with the -f Dockerfile flag. The -f flag specifies your Dockerfile name. The “.” command will use the current directory as the build context and read a Dockerfile from stdin. The -t tags the resulting image.
docker build . -f Dockerfile -t events-fe:1
Containerizing your Node.js backend
Let’s walk through the process of creating a Dockerfile for our backend as the next step. First, create the following empty Dockerfile in the root of your backend Node app:
# Builder container to compile typescript FROM node:lts-alpine AS build WORKDIR /usr/src/app
Install dependencies
COPY package.json . COPY package-lock.json . RUN npm ci
Copy the application source
COPY . .
Build typescript
RUN npm run build
FROM node:lts-alpine WORKDIR /app COPY package.json . COPY package-lock.json . COPY .env.production .env
RUN npm ci --production
COPY --from=build /usr/src/app/dist /app
EXPOSE 8000 CMD [ "node", "src/index.js"]
This Dockerfile is useful for building and running TypeScript applications in a containerized environment, allowing developers to package and distribute their applications more easily.
The first stage of the build process, named build, is based on the official Node.js LTS Alpine Docker image. It sets the working directory to /usr/src/app and copies the package.json and package-lock.json files to install dependencies with the npm ci command. It then copies the entire application source code and builds TypeScript with the npm run build command.
The second stage of the build process, named production, also uses the official Node.js LTS Alpine Docker image. It sets the working directory to /app and copies the package.json, package-lock.json, and .env.production files. It then installs only production dependencies with npm ci --production command, and copies the output of the previous stage, the compiled TypeScript code, from /usr/src/app/dist to /app.
Finally, it exposes port 8000 and runs the command node src/index.js when the container is started.
Defining services using a Compose file
Here’s how our services appear within a Docker Compose file:
services: frontend: build: context: "./frontend/events" dockerfile: "./Dockerfile" networks: - events_net backend: build: context: "./backend" dockerfile: "./Dockerfile" networks: - events_net db: image: mongo:latest ports: - 27017:27017 networks: - events_net proxy: image: nginx:stable-alpine environment: - NGINX_ENVSUBST_TEMPLATE_SUFFIX=.conf - NGINX_ENVSUBST_OUTPUT_DIR=/etc/nginx volumes: - ${PWD}/nginx.conf:/etc/nginx/templates/nginx.conf.conf ports: - 80:80 networks: - events_net
networks: events_net:
Your example application has the following parts:
- Four services backed by Docker images: Your Angular frontend, Node.js backend, MongoDB database, and Nginx as a proxy server
- The frontend and backend services are built from Dockerfiles located in
./frontend/eventsand./backenddirectories, respectively. Both services are attached to a network calledevents_net. - The db service is based on the latest version of the MongoDB Docker image and exposes port 27017. It is attached to the same
events_netnetwork as the frontend and backend services. - The proxy service is based on the stable-alpine version of the Nginx Docker image. It has two environment variables defined, NGINX_ENVSUBST_TEMPLATE_SUFFIX and NGINX_ENVSUBST_OUTPUT_DIR, that enable environment variable substitution in Nginx configuration files.
- The proxy service also has a volume defined that maps the local
nginx.conffile to/etc/nginx/templates/nginx.conf.confin the container. Finally, it exposes port 80 and is attached to theevents_netnetwork. - The
events_netnetwork is defined at the end of the file, and all services are attached to it. This setup enables communication between the containers using their service names as hostnames.
You can clone the repository or download the docker-compose.yml file directly from Dockersamples on GitHub.
Bringing up the container services
You can start the MEAN application stack by running the following command:
docker compose up -d
Next, use the docker compose ps command to confirm that your stack is running properly. Your terminal will produce the following output:
$ docker compose ps
NAME IMAGE COMMAND SERVICE CREATED STATUS PORTS
events-backend-1 events-backend "docker-entrypoint.s…" backend 29 minutes ago Up 29 minutes 8000/tcp
events-db-1 mongo:latest "docker-entrypoint.s…" db 5 seconds ago Up 4 seconds 0.0.0.0:27017->27017/tcp
events-frontend-1 events-frontend "/docker-entrypoint.…" frontend 29 minutes ago Up 29 minutes 80/tcp
events-proxy-1 nginx:stable-alpine "/docker-entrypoint.…" proxy 29 minutes ago Up 29 minutes 0.0.0.0:80->80/tcp
Viewing the containers via Docker Dashboard
You can also leverage the Docker Dashboard to view your container’s ID and easily access or manage your application (Figure 5):
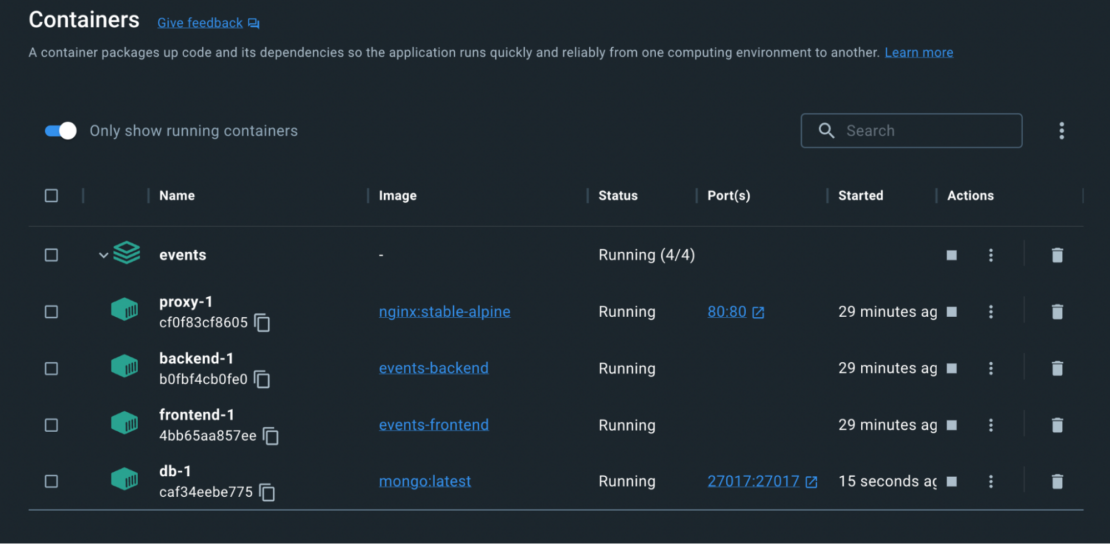
Figure 5: Viewing running containers in Docker Dashboard.
Conclusion
Congratulations! You’ve successfully learned how to containerize a MEAN-backed Event Posting application with Docker. With a single YAML file, we’ve demonstrated how Docker Compose helps you easily build and deploy your MEAN stack in seconds. With just a few extra steps, you can apply this tutorial while building applications with even greater complexity. Happy developing!